Wednesday, November 30, 2011

wnwn bread pudding

bread pudding
I had a bread pudding conversation with my brother-in-law over Thanksgiving. He's a tremendous cook who loves bread pudding, but has never enjoyed the recipes he's tried. Hmmm. I don't use a recipe. It's one of those throw-it-all-together dishes that I like to make, and my family loves to eat. Made me think I should share what I do, in case you have a hankering for some good comfort food and some stale bread on hand. In the past, I was the main "heel eater" of the family. I gave up wheat last spring (a whole post in itself!) and the bread ends/heels started piling up. I keep all old bread in a bag in the freezer. Sometimes they turn into bread crumbs and croutons, but mostly I wait until the there is enough to fill a shallow baking dish (approximately 8" square). This lends itself to child participation... or even complete kitchen independence. Always a good thing.
  
Waste Not Want Not Bread Pudding
  1. Gather bread, thaw if frozen.
  2. Preheat oven to 350 degrees.
  3. Make custard. Beat 4 or 5 eggs into 1 cup of milk.
  4. Mix 1/3 to 1/2 a cup of sweetener (syrup, honey, sugar) and a dash of vanilla.
  5. Rip bread into bite sized pieces and fill baking dish. Pour on custard and let sit for 10 minutes.
  6. Add 1/2 cup or so of mix-ins like dried fruit, chocolate chips, citrus zest... you get the idea. Use a fork to simultaneously mash the bread and mix in the extras. I tend to keep the crust sides down for a lighter appearance. Just a little something that makes it more appealing to my kids.
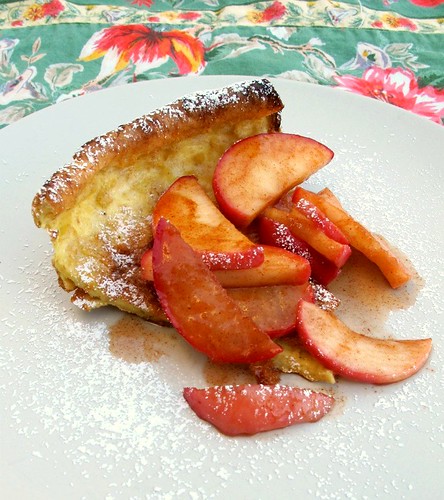
  7. Bake until golden on top... around 45 minutes. Serve warm.

 ****************
I find reinventing leftovers and food bits as exciting as any other repurposing! Do you enjoy clever transformations of the edible variety, too? Pin It

Tuesday, November 29, 2011

security stars

Making pAper stars in my daughter's classroom all morning. So fun!
Last week I fell in love with a star. A paper star. A simple to make and beautiful to behold star. My friend Kathrin made them as a young girl growing up in Germany. She showed me how easy they were, and then we taught all of the children in our daughters' class (see above photo). The ages range from 6-9, and they were each totally successful... just to give you a sense for your own children. Kathrin has a tutorial to follow right here.

There are two changes that we figured out with the experience of making them with so many children. Use a glue stick instead of white glue, except for the last step when you need a stronger bond for holding each half together. Clear glue is nice for that, but good ol' original Elmer's is just fine.
star construction
A pair of old scissors (they might get sticky) helps tremendously when pasting the flaps of each star point together. Like so:
using scissors
I can't stop making them! They come together quickly (in minutes!) and look so impressive. I made a bunch to string as a garland. These were made out of 3" squares cut from security envelopes. The weight is slightly heavier than origami paper and makes them very sturdy. I always love mixing and matching the patterns, and this project truly shows them off.
security stars
Now that I've made my garland, I'm not ready to stop. Neither is my daughter. I think I'll cut a bunch of squares of other found paper and keep keep them in a basket with all the supplies needed to make them whenever one of us has a spare minute. They'll make perfect present toppers for everyone on our list!
star in hand Pin It

Monday, November 28, 2011

counting down with a december map

counting down
Since 2008, I've had a blast creating count down/advent calendars out of the unassuming, and quite humble, toilet paper tube. This year we will "roll" out one the three sets to revisit. I'm thinking 2010 strung as a garland. If you'd like to try your hand at one, they're quite fun to make and easy to adapt for plenty of child participation.
2010
2009
2008

The t.p. tubes I've been saving all year will definitely take on some holiday transformations, perhaps as ornaments... I'm in the very fun experimental stage, but will share soon.

Every year we count down to Christmas with a combination of treats, time tickets, and clues. I will be completely honest, I often don't know what it will be until the night before. Sometimes it feels like a mad scramble. This year we're switching things up to simplify life as well as to appreciate living simply during this busy season. Each night and weekend morning my children will find a slip of paper with an activity that celebrates the magic of this month. I am working on my list right now and making sure that each one corresponds accordingly with what I already know of our calendar. For instance, building ginger bread houses will happen on a Sunday vs. a school day with piano lessons. Just common sense, but I'm finding that the process is a bit like mapping out this month that has the potential to overwhelm me. Here's what I've got going on so far... I'm still playing with the dates:
  1. cut paper snowflakes and tape them to the windows
  2. make hot cocoa with candy cane stirrers
  3. bring in evergreen boughs
  4. bake cookies
  5. hang stockings
  6. fold paper stars
  7. string cranberries and popcorn
  8. decorate sugar cookies
  9. gather unused toys to share with others
  10. go tree hunting
  11. Make gingerbread houses
  12. decorate the tree 
  13. make edible decorations for the birds and squirrels
  14. read Christmas stories
  15. sing carols
  16. make salt dough ornaments
  17. make a card (or two) and send it to someone special
  18. Daddy's birthday choice 
  19. poach pears
  20. roll beeswax candles
  21. have a candlelit evening (and an unplugged night)
  22. roast chestnuts and take a drive into the village to see the lights
So much of what has made it to the list are things we do every year. Much anticipated traditions. I've seen my share of activity advent calendars over the years, but I had no idea what a sense of comfort and rhythm they create for the organizer. My December map! (I can almost here the sound of trumpets!) Are you ready to transition into next month, yet? Here we go...

editor's note: I was waiting all day for my friend Sonia to put up her count down activity list... she has inspired me for years with her wonderful December projects.  It's up now, so got take a look here! Pin It

NYC

Beautiful weather.
You may have imagined us having a very simple Thanksgiving down our quiet road. Not at all! We often head down to my husband's family in the the city for a boisterous gathering that is always delicious and quite a departure from our everyday. From watching the sun rise over the east river with a fresh bagel in hand...
City sunrise- over the east river, bagel in hand
to enjoying The High Line  with very soft front row seats...
Watching the highline

The highline
It's fun to shift gears for a while and give our children a taste of a very different lifestyle... with lots of cousins at their side. Hope yours was wonderful weekend, too! Pin It

Thursday, November 24, 2011

thank you

acones
For YOU! On this day of giving thanks (here in the states), I want to send out a big hug to each and every one of you.

p.s. a little smile for you in the form of these acorns... or as we've named them "acones".
 
acorn cap+baby (hemlock?)cone=pure sweetness
Pin It

Tuesday, November 22, 2011

simple nature wreath

grapevine
Look what I gathered beneath dark clouds. They were wrapped around the branches of one of our locusts and when I yanked, they fell to the ground in one round coil. These wild grapevines were begging to be this year's wreath. I listened to them.
vines
They asked to be tied gently but firmly with garden jute so that they could keep their nice circular shape. The strands of jute invited dried seeds, rose hips, and spiky thistles to be tucked in between the strands. A gorgeous skeleton of a tomatillo husk stuck to the thistles like velcro.
bits
Pine cones were secured between a few vines and it was done. Wow! This was my easiest and most satisfying wreath to date. It might just be the prettiest one, too.
grapevine wreath
What do you have lying about... whether it be in your recyling bin, scrap basket, or backyard? If you listen to the materials and honor their properties, I bet you'll find a simple and lovely wreath just waiting to be made. Pin It

Monday, November 21, 2011

desire to inspire blog tour and a giveaway!

Happy Monday! I have a treat for us to start this week off,. My dear friend, Christine Mason Miller, has written a new book (her third!), and I'm really happy to be on the book tour. Congratulations Christine!  Desire to Inspire: Using Creative Passion to Transform the World – is a collection of stories, exercises, images, quotes, and anecdotes from twenty extraordinary women, all sharing insights and experiences of how they create a meaningful life and, in turn, make a positive impact on the world.
 
This list of contributors has me all fired up. Several of them are online friends, a couple I've been honored to spend time with at Squam, and one of them is my spirit sister, Pixie Campbell. Combined with Christine's magic, this is bound to be a beautiful and powerful book.
 Each chapter discusses a different aspect of living a passion-fueled life, and this month Christine is offering a 60-Second Snapshot of every chapter as part of her Desire to Inspire Virtual Book Tour. Click here for all her online book tour dates and check her blog for some delicious snippets from all of those beautiful women pictured above.

On today's tour stop Christine shares a taste of Chapter One ~ A Force of Good:
 “Most of the time I channel my desire to be a force of good through very tiny pinholes – a moment here, five minutes there – always mindful of how impactful these small opportunities for kindness can be.”  ~Desire to Inspire
My desire to be a Force of Good in the world is not only about creating art, sharing business advice, and writing a book such as Desire to Inspire, it is also about being kind to everyone I interact with as I run errands, walk my dog, and run my business. It is about taking good care of my family, and offering encouragement and support to my friends. I am a huge fan of snail mail, expressions of gratitude to strangers, and sincere apologies to soften a conflict. 

Desire to Inspire begins shipping next month... perfect timing for gearing up for a fresh new year. Christine is kindly offering one of you a copy as soon as it arrives! Simply leave a comment here before Saturday, November 26th. Leave away for me to contact you, and I'll announce the random winner next Monday morning.Good luck!

And the winner is:
Melissa said...
The book sounds amazing! I'd love to curl up with this for some beautiful inspiration.

Congratulations, Melissa!
Pin It

Saturday, November 19, 2011

gratitude reminders

gratitude prompts
I cut out the printed leaves with the plan to write on the back of them. As we near Thanksgiving, we always take time to acknowledge what we are grateful for. Writing it down reinforces it for all of us, but this year I thought about creating some prompts- ones that could be read out loud at the dinner table now or any time of year.
Here are some others I've been writing down to go with the two above:
-I am grateful for (each member of the family) especially when he/she _______.
-I appreciate the sun because________.
-I love the moon because__________.
-I'm thankful for this insect and this is why____________.
-I'm grateful to the Earth because_____________.
-I love my body and am grateful that it can______________.
-I'm thankful for my home because_____________.

This is a good start, but I bet you can think of one or two I've missed. If so, please share in the comment section. I've got a few leaves left that need filling! The gratitude bucket I gave you a peek at yesterday is the perfect place to store our thankful reminders.
leaf bucket

There's been so much bucket-making action (all over the world!) that I wanted to make a new one, too. I used the patten from the medium round burlap bucket and eliminated handles. I printed two pieces of stiff linen ( formerly a linen blazer) for the outer layer. Linen takes ink so beautifully it makes me weak in the knees! Versacraft stamp ink is my favorite for carved stamps on fabric. It's permanent once it's been heat set. Do an Etsy search under supplies to find the colors you'd like. The interior is just a section from an old drop cloth, a few paint splatters are a reminder of its former job.

I had no idea how much inspiration I'd gain from last weekend's simple walk in the oak forest... thanks for joining me as I followed my "oak arrow". Pin It

Friday, November 18, 2011

peek

Peek
Today is full... no time to write about the evolution of my oak stamps. Oh well. I was excited, because I did finish... yay for completion!  I'll share details this weekend. Here's a little peek...
Happy Friday!
Pin It

Thursday, November 17, 2011

oak stamps

Turns out this week is devoted to the oak leaf. I have been wanting to carve leaf stamps for awhile, but had always assumed I'd use one as model and free-hand it. Not what happened. I traced one!
leaf carving
Every leaf is so unique, and this one's "shape" will live on as a design after the original has decomposed in the earth.  As I investigated each leaf's details, I studied the complex map of veins reaching out from their centers in a new way. I painted the back of one to enhance the definition of this network of arteries. Still fascinated, I created a rubbing of one of the more delicate leaves.
leaf experiments
Whenever I carve a stamp, I transfer my pencil drawing by flipping over the paper onto the carving block and rubbing it with  pencil. So, why not do that with a rubbing, too? Double rub!
leaf prints
They look especially nice in a grouping so printing a bit of old fabric might be perfect, and I have another idea too... just need to find some time by the fire tonight to cut them all out.
Note: I used Staedtler's Mastercarve block for these stamps. Pin It

Wednesday, November 16, 2011

wednesday wip

Wip
Leaf experimenting quickly turned into carving... more tomorrow.

I don't often post on Wednesdays anymore, but I just wanted to pop in and send a big hug to all of you that purchased a pattern yesterday... and while I was sleeping! Oh my! Thanks so much... the energy of so many folks sewing and organizing is almost intoxicating. I love it and now am feeling the urge to make some more buckets, myself.
See you tomorrow! Pin It

Tuesday, November 15, 2011

nature buckets

gathering bucket of nature
Bringing the outside in is my favorite way to get ready for the winter season. Sticks, branches, pine cones, nuts, berries, bark... they're all fair game for gathering. After posting yesterday about  nature wreaths, I realized that we had to get going before the rain set in for the week. Out came our trusty buckets. I figured we'd leave the pine cones by the wood stove to let them dry and open, and then perhaps work on a project later this week. This photo was ultimately meant for that post, but when I read Soule Mama this morning I realized that today was the day to talk about buckets! Amanda has been busy with my bucket pattern. For nature sorting. Love that! We both have 6 year old girls with big ideas, and I was so happy to see how she created beautiful buckets to help Adelaide organize her inspiration. My daughter still uses her little acorn gather bucket. It's unlined burlap to handle the dirt and sap of pine cones. It has only one handle, but is essentially the small bucket from the nesting bucket pattern. The big one, pictured above, is one of my first buckets, but is very similar to the large size of the nesting buckets. So, if you're going to be doing some gathering... you may want to try your hand at one. The pattern was created for beginning sewers and busy parents- in other words: they're quick to whip up! Thanks Amanda, for your lovely review. Pin It

Monday, November 14, 2011

oak

wooded
Nothing like getting out into the woods. If you live near by, the upper gorge trail at Taughannock is worth hiking: right now. Laura goes several times a week and recently gave a great tour here. Yesterday we walked, ran, and rolled in miles of oak leaves. There were so many varieties we couldn't help but gather and share our favorites. Look at the beauty of each step we took!
oak leaves
Some inevitably came home.
oak leaves
To identify...
oak
And to craft with. All of our maples are long gone, but these freshly fallen oak leaves promise a last chance for more leaf crafting.We have our favorite projects: water colored fall leaves and a fall bunting, but it's fun to try out at least one new idea each year. I'm particularly excited to experiment with Jean's technique for doodling on and preserving leaves. And when we're done with leaves, we may move right on to pine cones and other gathered bits with our nature wreath making. I'm loving the deep and subdued hues of November more than ever this year. I hope you get a chance to walk in the woods soon... whatever season it may be in your neighborhood. Pin It

Friday, November 11, 2011

11.11.11

11.11.11
 Salud!
  At precisely 11:11am and 11 seconds our family celebration began! Green smoothies and cow bell ringing commenced. Here's to the magic of numbers and days! May you have a good one. Pin It

Thursday, November 10, 2011

intuition

wool pouch
 Investigating new materials necessitates a thoughtful exploration of what works and what does not. And that is exactly what this little woolen pouch became for me in the tiny free moments this week has offered. I have enough things that must get done each day, and having a source for play for maybe 10 minutes here or 20 there has been totally satisfying and just plain fun! Experimenting asks you to make creative choices based on  intuition and allows for mistakes along the way. The red wool triangles that had felt (no pun intended) very geometric when I cut them out asked to be something. I turned  them into arrow heads at the end of each tuck. The fact that one is a little wonky was just part of me learning how to work with such incredibly thick wool. No easy task. I tried out different widths for the tucks and decided that the thicker ones are my favorites. The thin ones are very tricky to keep even, and I may even rip out the stitches on that wiggly skinny one on the pouches flip side.
other side
When I appliqued the red pieces to the front side, I enjoyed the red stitching on the reverse side, so I mimicked it on one of the arrows here.
arrow
I added a zipper so that this "play" could become functional, but discovered that although I've made unlined wool pouches in the past... not such a good idea with this thick stuff. No zipper snagging yet, but I'm positive there will be a stuck zipper issue in the not too faraway future. Live and learn. Experiment and discover.
interior
Trying new things, while listening to my inner voice for guidance, has long been my approach... but these days I'm deepening this practice. I'm getting quieter so that I can better hear the answers. It's touching every facet of my life, not just wool pouches! Instead of waiting for New Year's to make my resolutions, I'm following my intuition and new goals are being achieved simply by living with ears to my heart, instead of lists on paper. I've long felt a shift taking place, but didn't put it into words until this morning's cup of tea. So obvious. So right.
Always!
Note: Just as I pushed the publish post button, a light bulb went on... arrows! I made arrows in multiple directions. Follow those heart red arrows! Intuitive choices are always significant,aren't they? Pin It

Tuesday, November 8, 2011

wool experiments

wool felt
I've been playing with a new to me kind of wool. It feels like both a luxury and a necessity to take some time to experiment.  I had tea with my friend Kate a few weeks ago... you know Woolen Moss Kate, and she showed me the most amazing slippers that she had made out of the wool felt from her very own sheep. I was so impressed and said she must make them an offering in her shop.(And she did... and they're right here!) I was also curious if she had more wool felt that I could see and touch. One thing led to another, and I went home with a sheet of gorgeous natural organic wool felt... from sheep around my freakin' corner! Yay for shepherdesses! I've been oggling it for days. I just couldn't cut into it until I knew what it would be. Well, enough of that! I finally cut out two squares for playing.We all need to work on that  "too precious to cut" stuff that holds us back.
wooly felt
I just had to see how it felt on my machine and in my hands and with a rotary cutter. I loved the contrast of red that Kate's slippers had. I love splashes of red with all of my neutrals. I cut up a few triangles from an old red suit and played with pin tucks.
wool experiment
wool felt 3
wool felt 2felt work 1
I don't quite know where it's going. And that's the point.
 Experimenting- it really is a necessity!
Pin It

Monday, November 7, 2011

scrumptious chard pesto and some food photo tips

chard pesto
Hello food loving friends!  I am so excited to tell you about our delicious discovery Saturday night- chard can be substituted for basil in pesto! Who knew? Probably YOU, but I hadn't a clue. I've successfully tried other greens before, but nothing has come as close to basil as swiss chard. The funny thing is that I'm not even a big fan of chard. I love all greens, but it's one of the lowest on my list. Not so anymore. So if you're missing the fresh vivid green pesto of summer, just substitute some chard (with the stalks cut) off for basil in your favorite pesto recipe. I added a squeeze of lemon juice and a little extra olive oil.
 ***
My weekend was all about baking and souping (new and old recipes alike). There were so many opportunities to snap shots of pretty food that it got me thinking about my relationship with my camera and our kitchen. Uninspiring food pictures just make me sad, especially when the recipe is a good one. I've definitely taken my share of poorly photographed meals, but have improved over the years. If you have a blog and like to cook, most likely you've included some food posts. I thought I'd share some of the simple things I do to make the most out of what's on our plates. Let's use Sunday's breakfast as a teaching tool, because I took a rather blah pic, before I got in gear for more enticing one.  As a huge popover fan, I had been wanting to try Amy's Dutch Baby every since Amanda blogged about it last week. The time change had me all turned upside down and a super fast recipe was in order for growling tummies. Because I hadn't planned on taking pictures, that puffy Dutch Baby collapsed before I even grabbed my camera.*Sigh*
food photo that needs umph
There were lighting obstacles, as well, so I let everyone serve themselves a slice and then served YOU a slice and ran outside with it. I reached for a tablecloth on my way out the door.
behind the scenes
dutch baby and caramelized apples
Isn't that  final photo a little tastier? With caramelized apples and a dusting of sugar it was devoured instantly. In fact, I might double the recipe next time. So here's a little list of things I do to ensure delicious images:

9 tips for better food photos:
  1. keep your camera in the kitchen
  2. use natural indirect light- set up a tray at a window or bring it outside, but not in direct sunlight (I take almost all of my pics outside when the weather permits)
  3. keep backdrops at the ready- a tablecloth, dishtowel, or favorite piece of fabric ( I love my old cutting board's rustic appeal and it's in many of my shots)
  4. shoot above it, but not directly over it
  5. use simple plates and bowls that don't take away from the food
  6. style a pretty serving and then offer it as seconds to someone in your family
  7. keep your camera hand steady or use a tripod
  8. tweak with any simple photo editing tool if the light isn't just right
  9. upload your photos to your blog in a nice large size... now that it's a delicious picture show it off!
(Instagram is a fun new way to casually share food photos- but I still use most of the same tips above with my phone)
Note: I am not a food blogger, even though I pretend to be some times! I am not a trained photographer and use a fairly basic camera. I just like nice pictures of good food. Between the time change and this post, I may need an early lunch today! Pin It

Friday, November 4, 2011

shooting shadow silhouettes

fern silhouette
Taking a walk in the woods is a surefire way to synthesize ideas and sort out new projects in my head. The air is clear and the birds are good company. Inevitably, I come home with a few bits of tangible inspiration- leaves, branches, sprigs of this and that. I find botanical patterns fascinating. To reduce the shapes into simple silhouettes, I use the sun when it's high overhead. I photograph the shadows so that I can incorporate them into stencils, stamps, illustrations and embroidery later on. It's really quite simple. If you're looking for interesting patterns and shapes for your own designs give it a try.
russian sage

last green leaf
leaf silhouette
rosehips
The only tools you'll need are your camera and the sun. This will work most times of the year, but fall stalks and weeds are especially stark and lend themselves to shadows beautifully.
lace
Bet,you can find some interesting materials out your back door, too. Try a neighborhood park to expand your repertoire. This is quiet, meditative work that doesn't take very long, but will slip you into an instant peaceful state. If your children are about, they'll enjoy it too... they are expert foragers, as you know. Have a wonderful weekend, friends! Pin It