

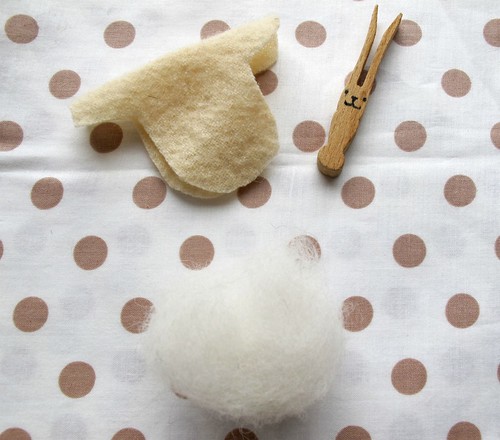
Need:
- wool roving
- felt scrap (mine is from a thin and light felted sweater)
- clothespin (without metal spring)
- pipe cleaner
- needle/thread
- fine tip sharpie pen
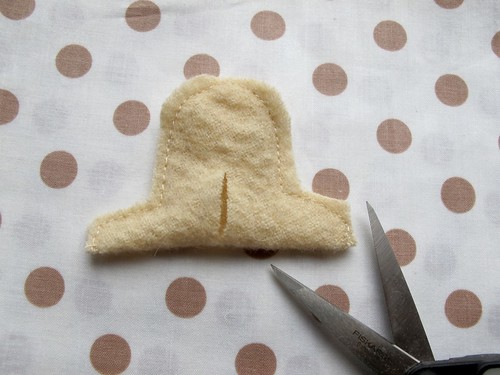
1. Fold piece of felt in half and cut out body shape similar to the one pictured here. The fold line is along the shoulders.
2. Sew around the entire open perimeter by hand or machine. Do not sew over fold line. Cut a straight slit approximately 1" long down the center of the back.
3. Turn right side out through the slit. Poke out sleeves with a chopstick, pencil, etc.
4. Fold a section of pipe cleaner to form a T as shown. Make sure it fits the dimensions of the body.
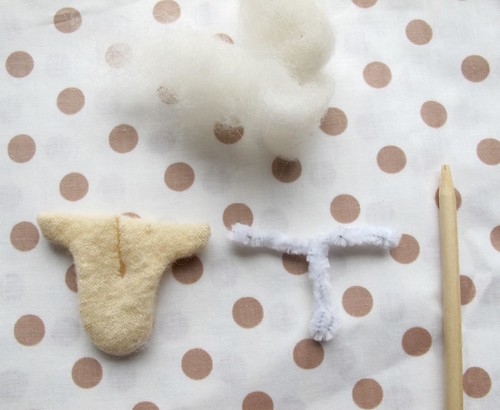
5. Wind some roving around the wire and then insert it into the slit in the felt body. Keep adding little bits of roving until the sleeves are padded and the bunny's shape has rounded out.
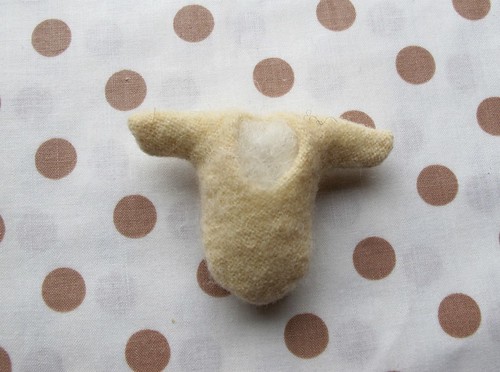
6. Insert the clothespin deep into the slit and then begin stitching closed the opening.
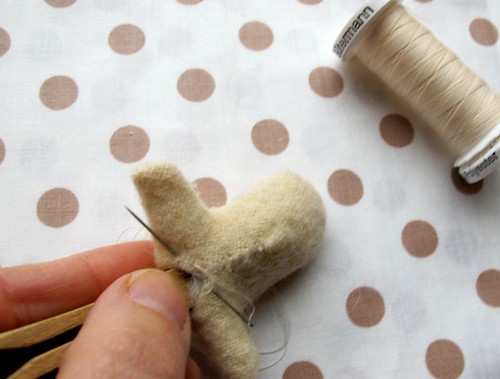
7. Before the thread is snipped, poke the needle towards the front. Sew a few stitches around the neckline to ensure that the soft body is securely attached to the wooden head on both sides.
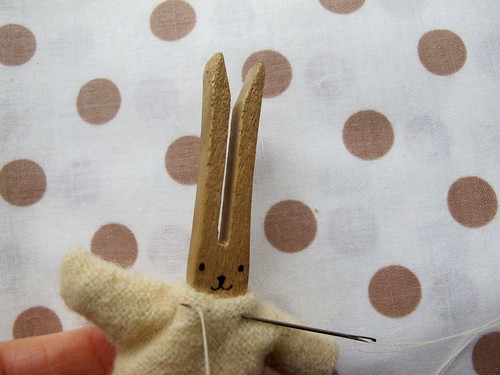
8. If you haven't already, draw a simple face on the front of the clothespin.
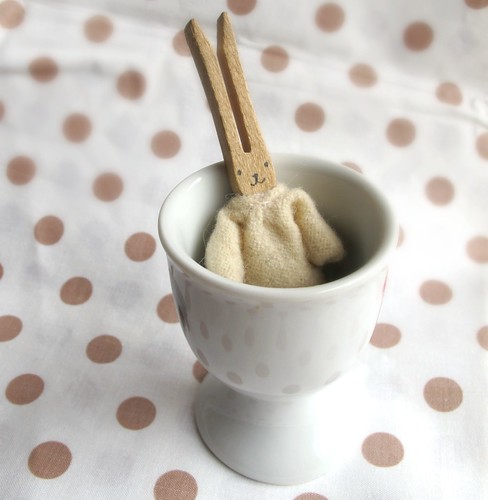
Done! Even sweeter than I could have hoped for. She fits into a pocket, a small hand, and even an egg cup! Now, just because I'm smitten with something, doesn't mean that it will meet my daughter's approval. Although she's (almost) always polite, I know when she truly loves something or not, and my crafting ego is at her mercy.
But it was adored instantly! Yay!Those posable arms, round tummy, and simple little face won my girl over so much that Baby Bunny got the most coveted treatment of all soft animals... "Can she sleep with me tonight, Mama?"

That was last night. As I write this post, the two of them are still snuggled in bed together reading every book about bunnies that we have on our shelves.
*Because of the size, these are not intended for children under 3.

just soooooooooooo pretty and sweet!!!
ReplyDeleteHappy Easter!
LOve
Gabi
My daughter would LOVE this! I may have to pick up some tiny clothespins when I'm in town this weekend. . .
ReplyDeleteSo cute! I'll keep this one in the back of my mind for when my daughter is a little older!
ReplyDeleteHappy Easter!
oh my god, that is the most precious thing! I know I have some nice bamboo fleece that would be perfect...now to find some clothespins!
ReplyDeleteThis is absolutely adorable!
ReplyDeleteso sweet - I think that the pipe cleaner is absolutely brilliant!
ReplyDeleteawwww ... just as sweet as can be!
ReplyDeleteyour heart is big ~ i am so grateful that you shared this ... : )
i am now going to retrieve a soft woollen skirt from the thrift bag to create some bunny love for little people ...
xo
prairiegirl
I've been searching all over the net looking for some little handmade goodie to hide on Easter and this is perfect! Thank you!!
ReplyDeleteVery sweet. Perfect little gift for an Easter basket. I will be making a few today. Thank you!
ReplyDeleteI love that bunny! Such a wonderful idea...thanks for sharing the tutorial.
ReplyDeleteHow darling...I think I will give these a try ! Thanks for sharing the tutorial, it's great! Enjoy your day ! hugs
ReplyDeletelil raggedy angie
This is adorable! I'm headed out to find clothespins!! Thank you Maya!
ReplyDeleteso darling! love this so much, Maya!
ReplyDeleteAbsolutley adorable! Thanks for the how-to!
ReplyDeletethat is the cutest.
ReplyDeleteCUTE! I have to make these - adorable.
ReplyDeleteTanya
How sweet! I'm starting to notice that it's often the pocket-sized things that are the big favourites
ReplyDeleteThis is absolutely adorable! I'm thinking this would be a big hit in my girls' Easter baskets!
ReplyDeleteSo soft and sweet..I'm just embarking on making little peg people...hopefully some bunnies! These little ones are adorable. Thanks.
ReplyDeleteWhat a sweet handmade gift for a little child!
ReplyDeleteThis is just tugging at my heart. So simple and sweet, I just love it. xo
ReplyDeleteooooh dear... these are so freeking cute!!! here I go to the fabric store... hahaha... thanks for the most loveliest pretty things to make! so inspired!
ReplyDeleteOh my goodness...that is the cutest little baby bunny ever!
ReplyDeleteWell, except for this little bunny: http://www.christinechitnis.com/2011/04/funny-bunny.html
:)
Happy Easter Maya!
Thanks so much everyone! And of course I'd love to see your bunnies if you give this a try.
ReplyDeletecute!
ReplyDeleteoh my goodness. so cute!
ReplyDeleteSo adorable! Love it! Thanks for the inspiration!
ReplyDeleteBecca
those are just divine! thanks for the inspiration...wil have to make these with my girls this weekend :-)
ReplyDeletexxxCate
Too cute. I love them.
ReplyDeleteI loved this so much I went right to my supplies and made some. I posted about it (with credit to you, of course) in my blog here: http://aimeeledwell.com/?p=381
ReplyDeleteThanks so much!
That is so cute. I think I'll make one and keep it for me :)
ReplyDeleteAaaaaaa! So cute!!!!!!!!!!
ReplyDeleteaw this is so precious! i think i will make min with little legs tho. i dont have any tiny wheelchairs on hand ;) thanks for the fabulous idea!
ReplyDeleteLOVE, Love, love it! I am headed upstairs right now to check for supplies. Thanks for sharing (as always)...
ReplyDeleteWho wouldn't instantly adore this little soft bunny baby? So very very sweet!
ReplyDeleteThat bunny is adorable. So soft and sweet. I have tons of cashmere sweater scraps. I know what I'm making!!! I know Easter is Sunday, but I'll be ahead for NEXT year, :-)
ReplyDeleteSo cute!
ReplyDeleteadorable!
ReplyDeleteThank you so much for the tutorial. My husband and I stayed awake till 3am sewing 23 of these darling little bunnies for Easter Sunday gifts. They were well received by all the little people....and I am at the mercy of my daughter too and she also slept with her bunny last night :) LOVE:)
ReplyDeletethis bunny is adorable!! Thanks for reminding us and reposting this today!!! Have a wonderful weekend!
ReplyDeleteI don't even know how to say how cute this is! Thanks for sharing!!
ReplyDelete