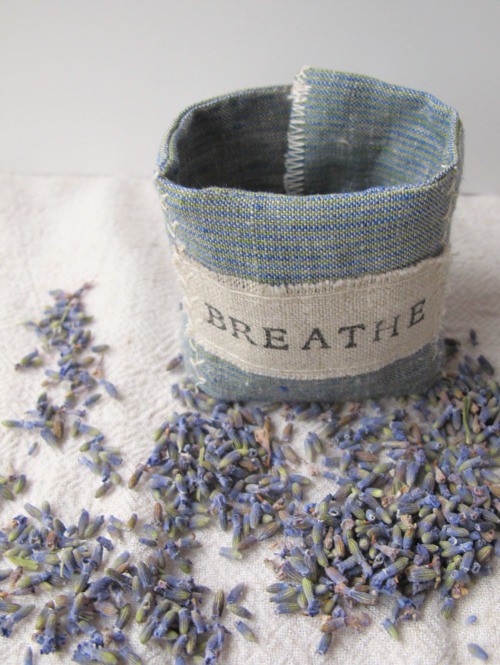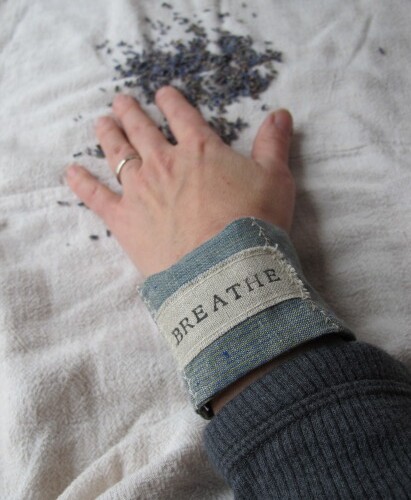
On the eve of my fullest month of the year (Chanukah, two b-days, an anniversary, Solstice and Christmas!), I am wearing my intention on my "sleeve": my very own wearable reminder to breathe. I made it right before we headed down to New York City for a wonderfully busy and family-filled Thanksgiving weekend. It did its job. Beautifully. Knowing this, I'm offering today's tutorial as part of the holiday Simple Gift Series to make for others... But I'm also suggesting you make one for yourself as you journey into your own busy month. A reminder that the rushing around is all really about love and giving. These cuffs are simple and quick, which means you can make bunches and still breathe.
Wearable Reminder: Lavender Breathe Cuff
Need:little letter stamps
ink pad (versa craft is great for textiles)
scraps of light colored linen
light weight fabric cut into two rectangles measuring 7 x 2 1/2 inches
hair elastic
button or two
dried lavender
Make:
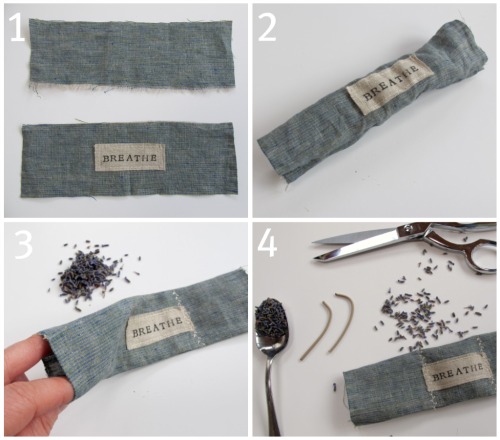
Before you get started, print a bunch of reminder words (breathe, be, slow, embrace, truth, etc.) onto little pieces of light colored linen. I used a ruler to keep it somewhat neat, but a little skewed letter or two adds to the hand stamped soul of it.

- Place your word in the center of one of your rectangles, and sew in place. There will be raw edges around the word. Pull a few threads to give it an intentionally frayed look.
- Place rectangles together right side to right side and sew up along the long sides. Turn to reveal a tube.
- Press with an iron. Create the center sachet by sewing up one side directly over one of the seams holding down your word. I used a decorative stitch. Fill with a teaspoon or two of lavender. You don't need a lot.
- Sew up the other side of the center sachet.

Finish it off by inserting a snip of an elastic hair tie on one end. Sew up each opening with a tight zigzag stitch. Add a button to the other side. An alternate version would include two elastic loops and two buttons. I found that after a weekend of wearing this one button cuff, the corners were turning. I decided to sew them down with a stitch or two (below right photo). Love it. Check out Etsy (under supplies) for lavender, stamps and ink pads... lots of options!

Enjoy yourself . Take it easy. Slow down. Breathe in. And out. Love fully. Find your peace.


I love lavender, I adore this cuff/sachet combo and I love the idea of walking around with a little reminder of calm stamped to me.
ReplyDeleteSimply beautiful Maya. Thanks for sharing. xox Corrine
ReplyDeleteso lovely! just the right kind of command :)
ReplyDeleteOh, very, very please, can you tell how you stamp your letters so nicely and how you do not have any ink from the sides of the letters!?!!
ReplyDeleteEverytime I try I get that smudge on the sides on my fabric!
I just love this tutorial and all that you do!
Thank you so much for this lovely tutorial. Now to search out some lavender. Wonder if I can get some in and then get the cuffs made in time for Christmas. I love following you.
ReplyDeleteYes, I was just thinking last week as I was putting some tea together how herbal jewlery would be quite nice. a sewn pendant (or earrings) with lavender might be quite nice too. I love your design! Thanks for sharing it!
ReplyDeleteGreat idea, Maya , can we share this great idea on ur site ?
ReplyDeleteSo very lovely! An essential reminder.
ReplyDeleteJust a quick note to let you know that a link to this post will be placed on CraftCrave today [01 Dec 01:00am GMT]. Thanks, Maria
ReplyDeleteI would also love to know how you stamp your letters so neatly? And what size of letters did you use? These are wonderful, thank you.
ReplyDeleteThanks! Every idea you give us is great!
ReplyDeletethanks everyone! I wish there was a magic trick to stamping letters. I, too, often get discouraged when it smears or a letter pops up or down too much. The key is practice, nice stamps, a rag to keep your hands clean and wipe off any extra ink on the sides of stamps, and a ruler. I also make sure to set the ink with an iron afterward. It's built in to this project as one of the steps. Hope this helps. I'm not sure of who makes these stamps as I keep them in a different container than the one they came in. All I know is that they were the smallest available at Michael's last year.
ReplyDeleteoh it's awesome. so cute and such a good reminder throughout the day. I want one!
ReplyDeleteI love lavender :) Thank You for this tutorial :) Hugs
ReplyDeleteLuck and lots of practice for the straight letters, I'm sure. I can't seem to make them look as straight as yours.
ReplyDeleteJody
What a great tutorial for something truly unique, I love it and it makes a great present too!
ReplyDeleteI love lavender and I love this cuff! What a thoughtful gift. Thanks for the how-to, I'll be spreading the word.
ReplyDeleteI love it! I think I'll make one as a reuseable coffee/tea cup sleeve too! :)
ReplyDeleteI love these! I love the lettering on these too. I Can never seem to stamp letters out quite as neat, straight, and spaced as you!! Do you have any tips? or is there some sort of tool?
ReplyDeleteMark
www.youllseeitmatters.blogspot.com