Showing posts with label Mama Goose. Show all posts

Thursday, September 23, 2010

wooden rainbows

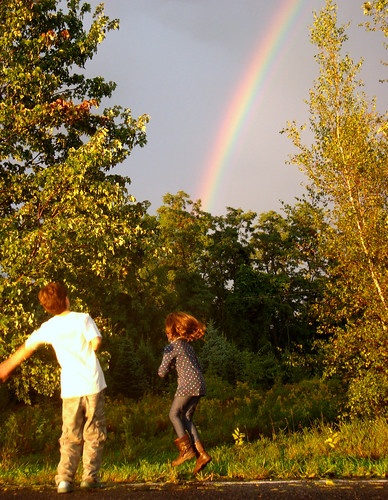
these two are my pots of gold!
I'm so glad you enjoyed the rainbow pictures earlier this week. Who doesn't stop in their tracks at the glimpse of nature's masterpiece? We're lucky to live in a valley that's blessed with lots of rainbows, and my children know the exact weather conditions, and kind of light that shouts "rainbow alert". During our hunts for those arcs of color, we've inevitably talked about the spectrum: red, orange, yellow, green, blue, indigo and violet (Roy G. Biv).
rainbow sticks
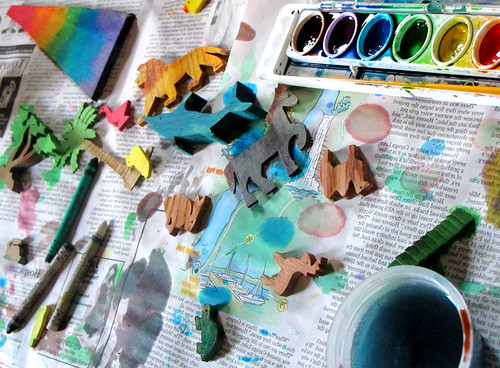
This has led to creating our own with crayons, markers, paint... etc. One of the simplest and most satisfying art projects we've done recently was stumbled upon by chance: painting watercolor rainbows onto wooden craft sticks. The water colors bleed into one another creating a seamless spectrum. Our countless rainbow sticks have been used for book marks, magic wands, and building materials for fairy houses. They're also considered "lucky sticks", good for tucking in pockets when going on adventures.

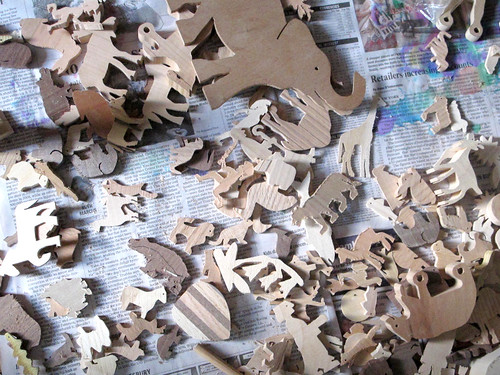
Such success with simple materials led us to paint watercolors on any scrap wood we could find:  the gorgeous outcome was so enticing. At the peak of this wooden passion, we rediscovered the the "Curiosity Bags" sold at our favorite local shop: Mama Goose.  Curiosity Bags are a wooden treasure trove of odds and ends, seconds, and leftovers put together by my artisan neighbor, Wild Apple.
wild apple toys 3
I've shared my love for Wild Apple toymaker, Gunther Kiel, before here and here. If you live anywhere near Mama Goose, don't pass by these humble looking bags. They are not sold as toys because they might need to be sanded or could be missing a part, but we found many pieces that were gorgeous... and for water coloring:  they're pure bliss. Parent supervision is necessary for young children because some of those bunnies and sheep are so tiny (and cute).
wild apple toys 2
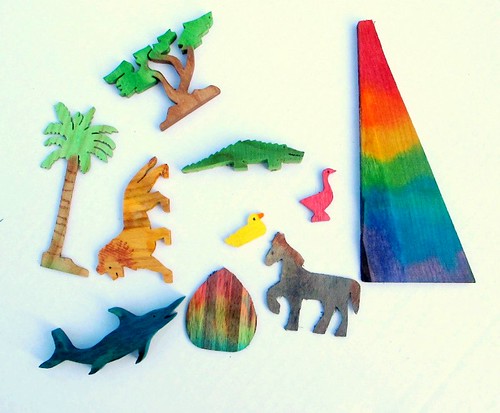
My daughter created this play set (I love that pink goose):
wild apple toys
So grab your watercolors and craft sticks, maybe peek into your garage for any scraps you have lying around, and count on hours of fun. You can also find inexpensive wooden shapes, animals and letters at all craft supply stores. But if you happen to be local,  run down to Mama Goose! Pin It

Friday, December 5, 2008

winter wonderland window


Hi friends! I've missed you all this week, but I've been so busy sewing snowflakes for the the Mama Goose winter window display. I finished installing it last night, and drove over this morning to take some pictures to share with you. I wish I had taken some last night... the little lights illuminate the window in such a magical way. It gets dark so early these days, it shouldn't be difficult to get a night time shot. There are really only three elements I created for the display window: trees, snowflake garlands, and coffee sack birds. I'm so happy with the trees!


I had the idea a couple of weeks ago, but you never know what the end result will be. I'll be sharing some tips soon, because I think variations of them would be fantastic in a playroom. I used this tutorial for a table top tree and enlarged it (free-hand) to five feet and on cardboard... painted snow white.
The burlap birds are made from coffee sacks, of course!

I was inspired by this creative woman, who used the Spool pattern to create the first burlap bird I had ever seen. My favorite part of my little flock? Their little stick feet, made from Burning Bush twigs inserted through the weave of the burlap... so easy and sweet!


The newspaper snowflake garland tutorial will be up next. I'm almost done writing it. The rest of the many store windows are simply decorated with twinkling white lights and a flurry of snowflakes. Last week, there was a craft day at Mama Goose. I put together a snowflake cutting station so that we could get children from our community involved in decorating the window. So many children walk in those doors everyday... it's really their store. I wanted them to feel like they contributed to the dressing up of the windows for winter... so this is their window.

I ironed their snowflakes and sewed them together, but the children did the creating! I'll be back soon, so you can make some of your own... Pin It

Tuesday, December 2, 2008

snow news is good news!

A flurry of newspaper snowflakes has arrived at my house! I've been snipping for over a week, as I ready myself for my next window installation over at Mama Goose. My theme of winter in the woods with recycled materials is shaping up nicely. I foresee two or three tutorials emerging from this project. I may be a little scarce around here for the next couple of days as I focus on preparing my materials.

I wanted to create vertical garlands... almost mobiles... of newspaper snowflakes. These photos show my first attempt at machine sewing a delicate thread through their centers. I think it's effective and can't wait to get it just right. I have a long and deep relationship with paper snowflakes and am looking forward to sharing my tips and stories in my tutorial. Until then, The Crafty Crow's Book and Activity Advent began yesterday, and the first book lends itself perfectly to this post... Snowflake Bentley. Check out her instructions for how to fold a six sided snowflake if you'd like to give one a try today. I'll be back soon with tips and instructions for making garlands and working with newspaper. Hope you have a beautiful day!

Pin It

Tuesday, October 7, 2008

simplified paper bag toadstool: a tutorial


When I chose a woodland theme for the Mama Goose window I knew there would be toadstools. I had been thinking along the lines of paper mache over recycled plastic containers. Last week, Pat from Zen Crafting (and my dear friend), e-mailed me this photo from Ann Wood's flickr photostream. I "faved" it immediately! How perfect is that! Everything I love: recycling, paper, ingenuity, and simplicity. Ann pointed to The Spore Project, by Doug Rhodehamel, for her inspiration for the paper bag mushroom. Doug Rhodehamel began this project to raise awareness about creativity in daily life and promote art education. His introduction says that "The project illustrates the importance of self expression, resourcefulness and creativity - specifically, how to look at one thing (a simple paper bag) and see what it can be instead of merely what it is." It also encourages everyone to make and "plant" mushrooms with the intention of getting the word out... so far 63,000 have been planted all over the world...can you imagine!! That's a lot of paper funghi. Please check out the whole site...it's fascinating! You can find his tutorial here for plantable shrooms if you'd like to spread this beautiful message by making your own.

The original tutorial is quite involved and is specifically for mushrooms planting in the ground. It's also not very child-safe since bamboo skewers and a hot glue gun are needed. I simplified the instructions to make this a craft that is do-able with a young child. Use any combination of instructions to create your own mushroom and then recycle them when you're done.

Materials:


-brown paper lunch pags
-paper towel for blotting
-red and/or white acrylic paint (optional)
-spot stampers (wine cork and pencil with new eraser...not shown in photo)

Make:


1. Open bag and put your fist in.
2. Squeeze bag around wrist.
3. Take your fist out and twist stem in one direction, tightly.
4. Roll the mushroom cap's edges to round them.


5. Tear edges around the stem's bottom for a more organic look. I did this with some, but not all. Keep in mind that you'll need some sort of flared bottom to help it stand up.
6. Paint top red.
7. Blot wet paint with a paper towel to give a softer, more natural appearance.
8. Admire and decide if you want to embellish more. I also attach a loop of tape to help the mushroom adhere to it's surface and stand upright.

9. Add spots with a wine cork or new eraser, depending on desired size.


So sweet! Try making different heights for each toadstool to make them unique.


My aim for making these toadstools was not as altruistic as The Spore Project, but maybe you will consider all of the benefits of delighting children (and some of their grown-ups) a happy excuse to forage for brown paper bags of your own. Make some, plant some, play with some. My 3 1/2 year old had so much fun helping with this "simplified tutorial" and photo shoot, that she ended up going off to her studio and surprised me with a little mushroom completely independently... it's that easy.


Are all of these little toadstools as beautiful as Ann Wood's stunning paper bag art? Of course not, but the many possibilities for open-ended dramatic play are exciting and adults might want to keep some for their own decorating, as well. We will bring them to our nature table and keep some for playing with fairies and dolls.


This entire project combined both my love of simplicity and the joy I find in a little magic and whimsy. So much fun!

Pin It

Monday, October 6, 2008

fall bunting with newspaper: a tutorial


How could I go through the Fall without making a seasonal newspaper bunting? This was inevitable! I made it over-sized for a store window, but this leaf and acorn banner feels perfect in our home, as well. It infuses our main room with the spirit of Autumn and simply makes us happy. Zencrafter thought it would make a wonderful banner for a Fall birthday...great idea!


This is an easy project using supplies you have around the house, and it's essentially free. If you follow my newspaper bunting tutorial, but use the "fall templates" provided, you could be hanging it in no time. The only thing you really need is lots of floor space for spreading out and painting. I used a large piece of brown craft paper rolled across my floor, which I can re-use over and over again.
I created templates from my husband's Golden Guide Trees from the 5th grade. It was even a bit old then, being published in 1952.


I love the vintage illustrations. They were perfect inspiration for creating iconic symbols of fall. This is my first time offering a .pdf to download. I discovered that it's virtually impossible directly through Blogger. So below you'll find my "indirect" links to the three fall templates...let me know if you have any trouble and I will do my best to remedy it.


Materials needed:
-tutorial: click here
-newspaper
-acrylic paint
-scissors
-paste
-an iron
-jute twine for stringing
-templates

A couple of notes before you get started:
1. I modified the maple leaf in your template...making it truer to form than the one in the pictures and sized to fit on piece of paper.
2. Print templates on card stock and then cut out shape to trace.
3. Lay the straight edge of each shape along the fold of the newspaper.
4. Lift leaves and acorns periodically while drying. This prevents them from sticking to your work surface, especially if they are painted on top of more newspaper.
5. Ironing is necessary (those oak leaves get so curly!), but goes very quickly.

Additional info: To use the templates you will need Adobe Acrobat Reader, which you can download for free here. Thanks Pat, for testing it out and passing on the needed tools...what a wonderful friend!

- acorn template
-maple template
-white oak template

Please let me know if you have any questions and happy Fall! Pin It

Saturday, October 4, 2008

recycled window display for fall


I'm here to share my recent window display at Mama Goose...finally! It was a bit challenging to capture the end result in photos. I kept returning at different times on different days, just hoping that the reflections on the large planes of glass would have lessened. No such luck. I do enjoy that what happens to be reflected is the big, old tree in front of the store. I sure hope my local readers will go have a peek.

Here are some of the features:
-recycled materials
-local farms
-Autumn
-the woods

It's a small and narrow space to convey all of this and highlight new products and gently used clothing...but I love a challenge.

Some of my favorite components are:
-The only props I purchased were pumpkins that I picked or were bought from a farm stand on the way into town.
-The burlap coffee bean sacks lining the "stage" were rescued from my favorite coffee shop (Gimme!).
I climbed into the window for the next two shots, so that you can see how I hot glued those lovely newspaper leaves to branches...

and created a stuffed paper bag squirrel to hide between the paper bag toadstools.


A local craftsman fashioned several tree stumps into perfect stools for children trying on shoes . I had to snag one for this display.


I also gathered chestnuts and pine cones from my yard to scatter on the "forest floor".

Let's not forget about the paper bag/newspaper owl. Since you last saw him, he's gained wings and wire (newspaper covered) talons...the better to perch with. He makes me smile. I especially loved watching young children's first reactions to him...they sure know their owls, don't they!?


I'll be posting two simple tutorials for the newspaper Autumn bunting I used in both front windows...


and paper bag toadstools the next time you drop in.


Pin It

Wednesday, October 1, 2008

on my desk...


on my desk... check here for other players.

Does the above photo give you a hint as to how many projects I'm juggling? It's all fun and exciting stuff, but a tidy little shot of my "desk" wasn't possible! There are so many fantastic things I want to try and not enough hours in the day. I'm staying up way too late and am back to coffee in the morning...but I'm not really tired. New "work" seems to fuel me even more than caffeine. So here's a break down of the above jumble. More leaves for the Mama Goose window. The installation was postponed until tomorrow, and I just keep making leaves in any spare moment! Yesterday, I received my first pattern from Sugar City Journal. After all of my "pattern fear", I decided to check out a handmade pattern for my first go. It suits my sensibilities perfectly! I can't wait for that free moment...soon please...to make a sweet new dress. It's a very simple pattern that begs for your own embellishing and unique interpretation. Like I said, perfect! I also love the little instruction booklet they send out with each pattern...very friendly. I might use some of that yummy green elastic on the first dress. My mother got it at garage sale and it just moved out of the barn studio and into mine! She has two rolls and is always generous! Have I mentioned she's a garage sale genius.


Sugar City Journal Blog
simple servant frock pattern

Peeking out of the top left is the linen tea towel for Cele, one of my give-away winners. Just a little way of me letting you all know that I haven't forgotten and hope to have them mailed out by this weekend. I'll post full pix of each winner's gift once they are on their way!

The little drawing in the middle is a quick little sketch that has been in my head all week. I keep thinking of the true lives of these lovely matryoskas I seem to see all over blog land. I'm glad I put it on paper (actually a very nice envelope that I rescued from the recycling). I'm wanting to try my hand at scanning in pen and ink drawings so that I can digitally color them with photo shop. Many artists I admire use the this technique...ZukZuk's work comes to mind immediately.
When I jumped over there to get her link, I saw that she is having another give-away! Letting you in on this will certainly decrease my chances of winning...but I just purchased one of her pieces the other day, so I can share!


Check out Resurrection Fern's posts here and here for a new and lovely twist on the traditional Russian doll. This drawing is part of a new challenge I took on at close to midnight last night...yes, I'm a bit crazy! The challenge is to draw something each day for the month of October. You can find out more at the blog of Bad Faery...it's probably not too late to join in. I'm going to squeeze this exercise into my daily routine because it feels very important to my artistic growth at this moment. My response to reading about it (longing and fear) made me know I had to push myself. I'll be posting my drawings every few days on flickr.

Hope your week is fun and full! Pin It

Thursday, June 12, 2008

the goose hatched!!!

Well...it quietly happened on Monday morning. Kelly Moreland (pictured above), founder and owner, opened the doors to the brand new location of her very popular children's resale shop, Mama Goose. There had been several weeks when the little Goose was closed as it transitioned over to the greatly expanded new site. The regular customers didn't need a huge grand opening announcement...they'd been hovering around the front doors for days with many "when, oh when will you open?!" So, this initial soft opening had quite a turn out. I stopped in on Tuesday...not as a designer, but as a shopper. My growing nine year old needed new shorts...and with Mama Goose's expansion, comes more stock in older children's clothing...hurray! There was a constant (moving) line at the check out...
I loved watching the expressions on everyone's face when they walked in through the front doors...total amazement... it's an incredible transformation, if I do say so myself! The windows, which had been covered during the entire "make-over", were flooded with sunshine. It's quite a thrill seeing some of my little touches incorporated into every corner. In the following shot of the tween section, note the bunting in the window and the floor cushions. Underneath the window benches, made from recycled crates, are galvanized locker bins filled with chapter books and modern light fixture was a craigslist find. you can click on any picture for a close-up.


I even got immediate great feedback on the baby wall ...from a mother who was so grateful to be able to put her infant in a safe spot adjacent to her, as she shopped. Her baby gave the best compliment of all...she didn't want to stop spinning those wooden shapes or touching the sensory frames!
Kelly is such a visionary, and we worked so well together as we put the new design into effect. She is definitely my favorite brainstorming partner, and I feel a bit wistful as this project comes to a close. Might need to call you, Kelly, when I choose colors for my studio...how can I ever look at paint chips without you, again!? Helping to design the new Mama Goose has bee a turning point in my creative life, and I'm thrilled to have helped someone make their dream a reality! Congratulations, Kelly! Pin It

Friday, June 6, 2008

goose tour!


I can't believe it...the Goose is ready! If you've been reading along, you'll know that I have been involved in a major expansion for a local children's resale shop, Mama Goose. It looks incredible...I think our town is in for a quite a surprise when we open the doors next week. The windows are still papered so that you can't peek in...but would you like a little preview? Many talented people contributed their time, sweat and creativity to make this store so unique... so come on in...but first admire the new front entrance...you know how in LOVE I am with galvanized buckets, well take a look at that mother of all buckets (2x2x6 trough from The Tractor Supply Co.)! Ok, now you can check out several interior shots:

1. Tiered table made from recycled wooden crates/stands (going out of business sale) and plywood: featuring local wooden toys made by Gunther Kiel of Wild Apple.2. Local goods made by kiddilidivy.
3. Baby play wall (designed/made by me) using assorted wooden pieces from a local artisan, each piece spins easily and on a differing axis....four sensory frames too!

4.Over sized galvanized magnetic wall...I want one in my home!
5. Book Table: great idea...empty paint cans bolted to the table for secure book ends..love it!
6. Galvanized pipe for clothing rack...upcycled old fryer racks suspended from chains to create shelves for things with little and loose pieces. Pin It