Tuesday, August 31, 2010

Eco Lunch Boxes: Steel & Wool

z steel lunch boxes
There were many preparations for my children returning to school today. My number one priority was to green up their lunchboxes... an investment in their health, as well as the environment's. We've always used cloth napkins, steel water bottles, and re-usable containers. This year I was determined to get away from plastic and move towards stainless steel exclusively. I discovered two great solutions for my very different children and am happy to share a bit about each one. My five year old daughter has serious ideas about her food... keeping each item separate is key. She also loves sorting and little compartments. When I saw the Planet Box  and their easy all-in-one design, I knew we'd hit the jack pot! It's all she's talked about for weeks! She was pleased with its simple steel look, but it has a bonus of some exciting magnets sets to choose from. The rainbows and unicorns were an obvious hit. Children can be very impressionable. If all of their friends have lunch boxes/backpacks with the latest media craze plastered on them it's so nice to have an alternative that is still "super cool"! We also got their carrier to make the whole system simple and straightforward for our youngest.
zplanet box
Our growing son (turning 12 in a few weeks) needed a larger container for his huge appetite. He was already familiar with the tiffin, from other kids at school, and it's sold at our co-op. There are several different sizes, all are modeled after the the traditional metal lunch boxes in India. We bought the 2 tiered one seen in the top photo. My one concern was how to create an insulated carrier. I pondered it up until yesterday. I was almost resigned to making a cloth carrier like the ones advertised with it, but along with another big price tag was the problem of an ice pack. It would have made a drippy mess by the end of each day in that thin cotton bag. What would be leak proof without using plastic or vinyl? I must admit that my inspiration came from their wool soakers my children wore over the diapers when they were babies. Wool would insulate and keep the moisture in. So simple, why hadn't I thought of it until the day before school? So yesterday we went through my stash of recycled/ felted sweaters. Nothing seemed quite hip enough for my guy. Then we remembered the vintage wool army blanket. It met his approval instantly. I had hesitated cutting into it before, but now I was happy to get the scissors. Ironically, my medium sized round bucket is the exact size for a tiffin. Go figure.
So I used my own pattern, with a few modifications to make it have a drawstring and shoulder strap. It has two layers of wool and one layer of batting. I finished right after midnight last night and am pleased. So is he, thankfully! If I had thought of it sooner I would have used some interesting strapping and hardware from old military bags,  but my last minute sewing lent itself to what I had on hand: the blanket. The closure uses "software" in the form of a slide cord the drawstring.
z wool lunch tote
If you're looking for an alternative to vinyl insulated lunchboxes, wool blankets are your answer!

z last day 049
I'll leave you with this photo, circa 1974 San Francisco (Precita Park is to my right). My first day of Kindergarten.
z first day of kindergarten
Clothing:
Hand painted  70's style Winnie the Pooh t-shirt (a favorite)
bell bottom jeans
red salt water sandals
Lunch box: 
Metal (the only choice back then!) anyone remember Korg on Saturday mornings?!

Happy last day of August!
Pin It

Monday, August 30, 2010

button collecting and crafting

buttons
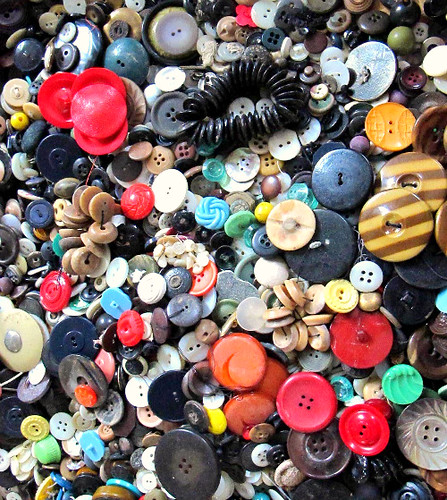
Buttons are so much more than just little " fasteners" of clothing. As any button collector will tell you, they are rich in color, materials and style. The truly old ones are like miniature antiques and speak of art, traditions, craftsmanship and family lineage. Oh, if buttons could talk! Can you imagine the  stories of adventure and long forgotten times they might tell... from the old brass buttons on a soldier's uniform to the highly prized jet buttons which decorated the black silk dresses of the Victorian age. Or maybe they would tell a little bit of our own tale: our grandmother's buttons from her wedding dress or even the little plastic bunny button that fastened a favorite purple jumper in the 1970's (ahem, that would be mine).

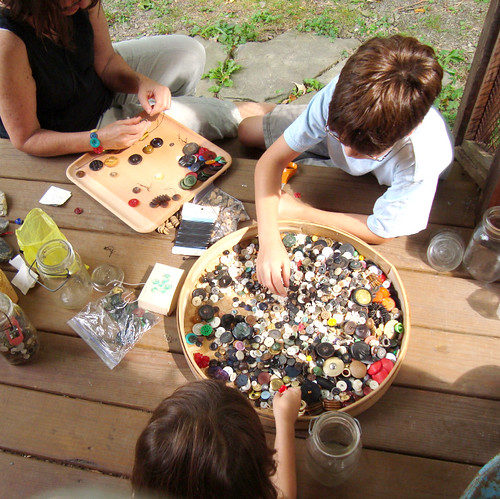
When I tweeted that my children and I were sorting through my mother's button collection, the response was universal... "I remember doing that as a child!" Her collection is quite vast now, compared to the little basket I upturned onto the floor as a girl. But I still found my old favorites shining through the masses as if they glowed! My daughter actually found those bunnies!
button porch party
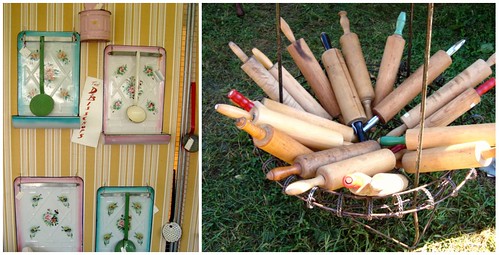
Trays are very useful for spreading out bunches of buttons and still keeping them contained. In our case, they also kept them from slipping through the cracks of the front porch. Sorting, counting, crafting... there are endless ways to enjoy buttons together. I always love to check out Lil Fish Sudios to see what Lisa has been up to on her button mondays. Some day soon we'll make Martha's button stamps.  Google button crafts, and you'll find a plethora of ideas. And of course, Amazon has dozens of button books.

So what did we do with all that inspiration? Easy, fun, instant-pleasure kind of button crafting!
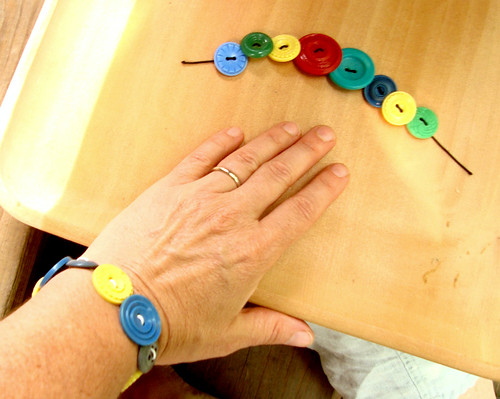
We made stretchy bracelets
button bracelets
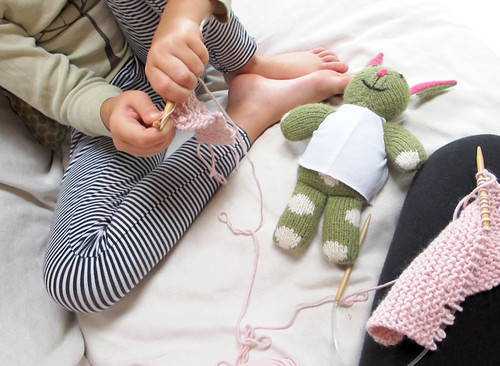
After arranging buttons of choice in a pattern, string them on an elastic cord by 
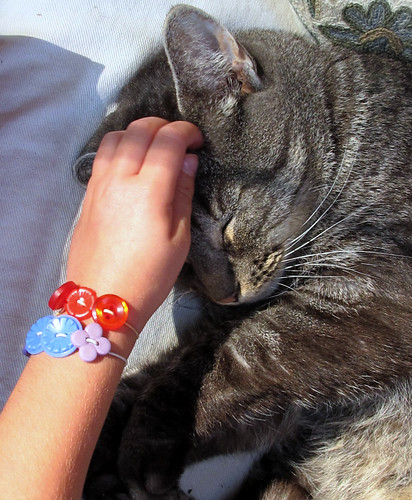
"poking up through the pretty side and the down through the pretty side", as chanted by my girl throughout each bracelet she made. Tie it on your wrist. Petting a sleepy cat is optional.
button bracelets and a sleeping kitty

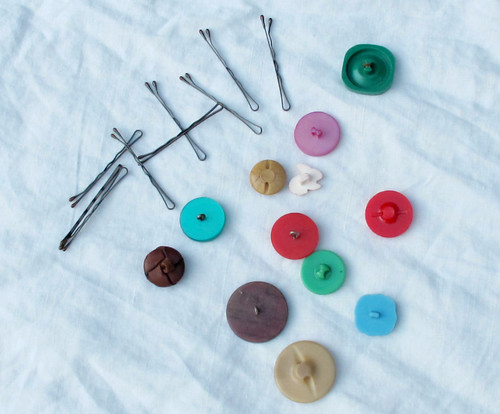
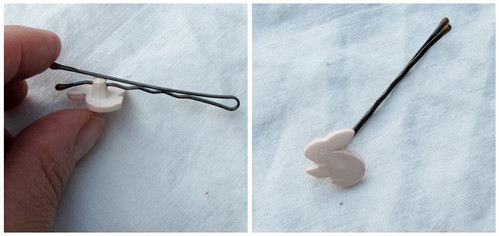
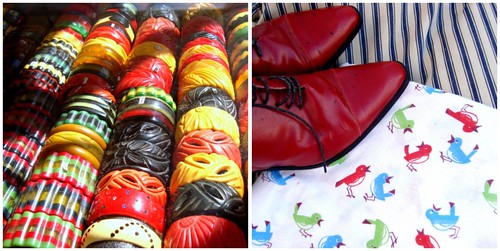
We also created some interchangeable hair pins. In the past, I made these more permanent by sewing a button to the end of a clip: very sweet and simple. But on this day we tried using buttons with shanks, instead of holes, for immediate success.
buttons shanks and pins
Just slip a bobby pin through the shank and voila! Oh, look there is that bunny! Can you guess who might like to wear this little one?
button bunny
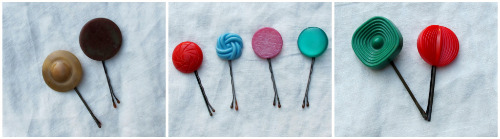
Who doesn't love an instant hair accessory: a lovely bit of vintage charm to tie back tresses?  Each button will adhere to the pin differently, depending on the shank. Some will be loose, others snug... but as soon as they slide onto your hair they are fixed place like a little bit of magic. We think the center photo looks a little bit like a cluster of lollipops!
button hair clips
Look for button collections at thrift stores, flea markets and garage sales. Do you collect buttons, also? Did your mother? I'd love to hear some of your button stories. Pin It

Sunday, August 29, 2010

fair days

We're savoring the last moments of August.
fair days 2
The fair came to town... with all of its gaudy charm and magic.
fair days 1
Do you remember what it looked like as a child? I caught a glimpse through their bright eyes.
fair days 3
Hope your weekend was grand! Pin It

Friday, August 27, 2010

flight

taking flight
 My mother is about to return to her California world... her other life. Sigh. My children have loved spending this summer with her for a million reasons and  can't wait for each new visit to the barn... because you never know what interesting project or fascinating story she'll pull out of her hat. An artist, collector, nursery school teacher, and world traveler make for a very fascinating grandmother. I've been documenting it all season long and will be sharing some of our favorites beginning next week. Activities, tutorials, and more.

But right now, I won't deny that we're all a bit low as we anticipate the hole that will be left when when my mom boards her plane. It's painful to be thousands of miles away from someone we love so dearly. The posts coming up next week will help us feel her close again, and I'm sure give you some fun ideas to try out yourself. *win*win*
Have a great weekend! Pin It

Wednesday, August 25, 2010

Sally Rabbit's New Scarf

sally rabbit's new scarf 
Today is a brand new day! Thanks for all of your loving thoughts last night and this morning. My daughter is doing quite well and my family is living with a bit more awareness and gratitude about each moment. Sally Rabbit has a brand new scarf and I have a brand new knitter*. I've gone from feeling like a so-so knitter to feeling like a knitting super star in my daughter's eyes. There is magic in what our children teach us.

*A little note about my knitting 5 year old... she has been finger knitting for almost a year, along with tons of other handcrafts (embroidery, braiding, weaving, lanyards, etc.). I believe she picked it up the needles quickly because of her intense desire and previous practice with textile crafts. Needless to say, she's hooked. After we bound off the scarf, we cast on for Sally Rabbit's new blanket. More pink. Pin It

Tuesday, August 24, 2010

Today

Our day started like any other...  but on  the way down to breakfast, my daughter slipped and hit her head. Hard. She was not being careless, nor going too fast. It just happened. In one second our day shifted. That's sometimes how it goes. 

After ice packs, arnica, and a loving lap had done their trick... a request came in. "Can I learn how to knit today?" Now this wasn't the first time my girl had asked, but I stopped knitting around the time I started blogging, and haven't felt very confident in my rusty abilities. When my teary eyed daughter asked today, I got out the soft pink yarn she had been coveting. I didn't even bother with the good beginning needles. I tried what I had in my basket... a circular 6 and we just went for it. I figured she'd hold the needles with me and we'd make her a garter stitch scarf together. I underestimated the deftness of those little 5 year old fingers. After several rows, she GOT IT! In order to have her feel some speedier gratification, I cast on (with bigger needles) for a teeny tiny scarf for her bunny (who had hit her head, too). We sat side by side knitting our pink scarves, and I smiled at the strange twist our day had taken.
the day she learned to knit...
Hours later, when her head began to ache everywhere, her doctor sent us fleeing to the emergency room.  I grabbed my keys... and gathered that pink yarn up, too. When my husband arrived at the hospital, he found us all quiet and relaxed. My son had a book and we had our pink scarves. Thankfully, our girl is just fine.

I doubt we'll ever forget the day she learned to knit... 
Pin It

Monday, August 23, 2010

Madison Bouckville

new blue scooter at home on the barn porch
My mother and I traveled through little towns, by old farms, and in and out of lush green valleys to reach a giant corn field filled with antiques... vintage paradise. For the second year in a row we visited Madison Bouckville's huge antique show and reveled in all things old and beautiful. This year we spent most of our time outside the gates in the little village that hosts the show. There were just as many dealers hawking their goods in every little alley or front lawn they could find to pitch a stall, and it was hard not to get side tracked in the most wonderful of ways. The history and palette of days gone by never fails to inspire me...
stars and chairs

shoes and baklite

ladles and pins

We only brought home a few lovelies this year... here's a peek:

vintager kodak photo clips
Kodak photo clips
 vintage textiles
cotton tatting and feed sacks
 jars and miner's pail
miner's lunch pail and blue jars

 And of course, that blue scooter in the first photo had to come to the barn. Mmm... hoping your weekend was filled with treasures, too.


Pin It

Friday, August 20, 2010

abundance::time::love

a is for abundant love
 So many "shouldas" and "couldas" these days. If I always kept my promise to my daily To Do list,  I would be missing out on so much REAL DOING. Summer vacation is winding down. My mother and children will be returning to their roles as students and teacher very soon...  I don't want to let a single shared moment slip by.  So instead I am partaking in: 
Indulgence. 
Abundance.
Indulging in abundance.
***
The indulgence of  abandoning  the To Do lists tacked to the bulletin board...
and discovering how magically that creates an abundance of time.
Time to unfold.
Together.

a is for aug trough
original barn trough moved outside and filled w/morning glories
a is for aug barn deck and jungle
the jungle in  back of the barn!
These photos were taken today as we sat on the barn deck eating and listening to our family lore as my mother brought out treasures and heirlooms to make each tale come alive.
a is for abundance
This sponge cake happens to be my grandmother's recipe and the spoon- my great grandmother's... recently discovered in a hidden box at the barn! These were unplanned moments. But ones we won't soon forget. I do hope you'll take this to heart:  if it's possible, turn your back on those daily obligations... maybe just for an afternoon. Treat yourself to some time... with your loves or simply SOLO. 
Indulgence~Abundance
See what happens...
Pin It

Tuesday, August 17, 2010

about those zucchinis...

zuke pancakes
 Small. Medium. Large. What do you do with all of your zucchinis this time of year? Here are some of my favorites:
Grated
zucchini
Peeled
zuke
  • take off the green outer skin and then peel the tender white flesh to create raw "fettucine". Toss with pesto or other favorite pasta sauces. You'll be amazed!
Slabs
zuke 2

  • 1/4 slabs arranged on a cookies sheet greased with olive oil and then drizzled with a bit more on top. Sprinkle with pressed garlic, parmesan cheese, oregano, and salt & pepper. Bake until golden and bubbly. Delicious as a side dish, in sandwiches, and rolled up with a smidge of gorgonzola or goat cheese in the center.

Pickled
  • Haven't tried this recipe, but it's quite similar to one I've used in the past... and you can't go wrong with  Zuni Cafe!
I'd love to hear some of your favorites, too! How do you make the most of zucchini abundance?
Pin It

Monday, August 16, 2010

urban inspiration

The Big Bambu at The Met
I gather inspiration wherever I go. Most often it's waiting for me right outside my back door. But as much as I love living surrounded by trees, sometimes I need a little urban shake-up. My family and I spent a jam packed weekend in NYC (yes, this road trip was on my mind when I created the felt board!).  I've come home with fresh ideas and new perspective that I'm sure will shape the artistic direction of my fall. I'm still digesting it all, but yesterday's visit to the Metropolitan Museum of Art was especially rich and delicious.
The Big Bambu at The Met
My husband and children had already seen the Doug+Mike Starn on the Roof:  Big Bambu exhibit during the spring... now it was time to bring their mama and grandma. 
The Big Bambu at The Met
Perched above Central Park, with the city skyline on the horizon, a bamboo sculpture towers into the sky  and defies any description I seem to be able to come up with this sleepy morning after... so here's the Met's description:
The monumental bamboo structure, ultimately measuring 100 feet long, 50 feet wide, and 50 feet high, takes the form of a cresting wave that bridges realms of sculpture, architecture, and performance. Visitors witness the continuing creation and evolving incarnations of Big Bambú as it is constructed throughout the spring, summer, and fall by the artists and a team of rock climbers. Set against Central Park and its urban backdrop, Big Bambú suggests the complexity and energy of an ever-changing living organism. Big Bambú is a growing and changing sculpture―a vast network of 5,000 interlocking 30- and 40-foot-long fresh-cut bamboo poles, lashed together with 50 miles of nylon rope. It will continue to be constructed throughout the duration of the exhibition. The first phase of the structure―measuring about 100 feet long, 50 feet wide, and 30 feet high―was completed by opening day, April 27. The artists and rock climbers are continuing to build up the eastern portion of the sculpture to an elevation of 50 feet. By summer, the western portion of the sculpture will be about 40 feet high. An internal footpath artery system grows along with the structure, facilitating its progress.

The Big Bambu at The Met
 They have their own flickr set for more glimpses into this amazing installation.

bamboo 1
Between that breathtaking experience, catching the last day of the American Woman: Fashioning a National Identity, and a day of window shopping in some of my favorite places in the Flatiron district... I'm settling in with my notebooks and camera to savor and organize the light bulbs that kept flashing in my happily over stimulated mind. Stepping outside of my everyday world is a sure way to breathe new life into my creativity. Where do you find your inspiration? Pin It

Thursday, August 12, 2010

castle peeps summer camp: diy travel felt board

cp playing
 Lizzy House has invited  me to be counselor for her virtual summer camp revolving around weekly activities featuring her latest amazing fabric: Castle Peeps. I could spend this entire post gushing about how much I adore Lizzy... what a brilliant, funny and loving friend she is... how her beautiful fine art is even more so in person... that she is the youngest textile designer around... yeah, see I couldn't  help myself.

But let's jump right into this latest tutorial: The Travel Felt Board! You can obviously make this with any fabric, but Castle Peeps' endearing characters and whimsical castles lend themselves perfectly to this craftivity. My five year old is so smitten that she announced: everything I ever make her should now be in Castle Peeps. Five is such a passionate age, you know.

  I'm going to give you the measurements used here, but really you can make up your own to suit your materials.
Need:
rectangle of cotton 14.5 x 25 inches
rectangle of blue felt 14.5 x 25 inches
rectangle of green felt 7.5 x 25 inches
extra felt for backing
fusible webbing (optional)
handles (tip: dark colors disguise wear and tear of grubby fingers) 6 x 9 inches
snip of elastic
button
needle
thread
2  pieces of cardboard- each being slightly smaller than the board folded in half.

Make:
  1. Fold handle pieces in half to make crease. Open. Fold both ends inward to center crease. Fold lengthwise again. Top stitch down both sides close to the edge.
cp pieces
   2. Place green felt on top of blue felt. Pin handles facing inward as shown. Pin elastic in the same direction as handles and in the center of right handle.
cp handles

3. Lay cotton right side down over the felt and handles. Pin in place.
4. Sew all the way around leaving the bottom open. Now stitch the bottom a tiny bit on each side... just an inch or so.
cp sandwich
5. Turn right side out and have a helper slide in one piece of cardboard.

cp cardboard
6. Sew straight down the center. Then add the second piece of cardboard. You might have to cut it and/or bend it a little to slip it in. Iron and pin the bottom together. Top stitch around the entire circumference. Sewing around cardboard is slightly tricky and might cause some wee wonkiness... but that might have just been me with my daughter asking "done, yet Mama" every few minutes.
cp seam
7. Make felt  castles and peeps... maybe even some clouds. Lay fabric on top of felt and cut out shapes. Stitch around the edges or use fusible webbing sandwiched between the two layers... or do both!
cp peep action
Felt sticks to felt. The green grass doubles as storage pockets! We love that part. Cleaning up is part of the fun. Don't forget to add a little button to the opposite side of the elastic loop. Keeps it all tucked in tight!

cp putting it away
Ready to go! This will be accompanying us on our next road trip...
cp travel board
Or maybe just out to the backyard!

Pin It

LinkWithin

Related Posts with Thumbnails